 |
| September 17, 2019 | Volume 15 Issue 35 |
Designfax weekly eMagazine
Archives
Partners
Manufacturing Center
Product Spotlight
Modern Applications News
Metalworking Ideas For
Today's Job Shops
Tooling and Production
Strategies for large
metalworking plants
9 tips for designing multipart assemblies
Creating cost-effective assemblies often means lower part counts, flexible-yet-simple product designs, and a look at alternative manufacturing technologies.
By Protolabs Engineering

The Protolabs Design Cube is a demo tool that shows part features that are too thin or too thick, bad bosses, right and wrong ribs, and other considerations to be mindful of while designing parts for injection molding.
Two basic tenets of design for manufacturing and assembly best practices are: Shrink the bill of materials (BOM) and make products easy to assemble. If that sounds easier said than done, read on. This design tip offers several ways to make your next multipart design less like a root canal and more like a day on the beach. Many of these tips are geared around injection-molded parts, but some apply to machined and 3D-printed parts as well. These include:
- Symmetrical parts
- Self-mating parts
- Family molds
- Hardware components
- Monoform parts
- Assembly considerations
- Overmolding and insert molding
- Liquid silicone rubber parts
- Alternatives processes
1. Searching for symmetry
It might be hard to wrap your mind around at first, but many assemblies traditionally constructed of two unique components can often be made from a pair of identical parts. Consider the two halves of a housing for a prototype gear-housing assembly. Conventional wisdom might say to put bolt holes in one half, threaded bosses in the other, then use half a dozen or so fasteners and washers to bolt it all together. But this requires machining two separate injection molds (or machining two unique parts, if a metal prototype is needed). By making the two halves symmetrical, distributing the holes and threads in each part equally and opposite one another, a single mold can be used, cutting tooling costs in half.
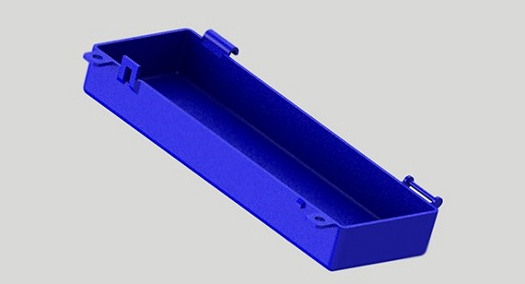
Making two halves of a box symmetrical (one half shown here), and distributing the holes and threads in each part equally and opposite one another, a single mold can be used, cutting tooling costs in half.
But why not get rid of the screws altogether? Our gear-housing example is now symmetrical, but it still requires manual installation of threaded inserts, never mind keeping track of all those pesky screws and washers. A simple system of mating clips and hooks allows the two halves to clip together, not only eliminating the need for additional hardware but making the assembly process a snap. Take this one logical step further and replace the clip mechanisms with a living hinge along one edge of the power drill housing and you now have a single-piece design. The bill of materials (BOM) has been reduced by 13 pieces, assembly time has been cut to zero, and there's just one mold to buy. You're a hero. You can also, by the way, 3D print living hinges with SLS nylon.
3. Family time
Another way to achieve hero status is the use of family molds, which are ideal when producing a series of parts with similar shapes and sizes. The two mating parts mentioned above are good candidates, as is any group of parts that make up a complete assembly. Obviously, all must be made of the same material, and the combined part extents must fit within the roughly 175-sq-in. (1,129-sq-cm) working mold cavity volume.
4. Hardware harmony
Everyone's heard the adage about reinventing the wheel. Designing and manufacturing your own nuts, screws, shafts, pins, keys, and dozens of other off-the-shelf components should be avoided at all costs. Better to redesign your product around standard hardware items, especially if production volumes are expected to rise at some point.
5. Moving to monoform
The properties that make plastics such as polypropylene (PP) and styrene butadiene (SB) excellent candidates for living hinges also make them suitable for other flexible components, providing clever part designers with opportunities to simplify assemblies and shrink BOMs -- in some cases, a once-complex assembly can be reduced to a single piece. For example, a series of metal shock absorbers in a piece of sporting goods equipment might be replaced with a plastic one, and molded together with the mating component. Instead of bolt-on metal leaf springs in a small lot of radio-controlled cars, mold them out of nylon as part of the chassis. Nor do designers need to adhere to traditional shapes -- a coil spring can easily take a curvy zig-zag shape, or that of an S, C, or sideways W. Just be sure the mechanical, chemical, and electrical properties of the chosen plastic are appropriate for the environment in which it'll be used.
6. Easy assembly
If a product must be assembled, attempt to make the task easier by orienting the various screws and connectors in such a way that all are accessible from the same side, thus minimizing part flipping and rotating. Use common hardware wherever possible, so the worker doesn't have to reach for different hand tools. Poke yoke (mistake-proof) the assembly by designing in alignment pins and guiding features to avoid mismatched parts. And spend a little time in the assembly room: Knowing the issues that emerge at this stage often yields big improvements in part design.
7. Over and out
Oftentimes, two or more components can be molded together. Rather than welding, gluing, or screwing a rubber grip onto a plastic instrument case, overmolding creates a permanent bond with no need for secondary assembly processes. The two plastics must be chemically compatible, but an array of material combinations and colors is available. Similarly, the aforementioned threaded inserts can be placed into the mold before pressing cycle start on the injection molding machine, permanently fixing the metal inserts in the plastic. A large assortment of bushings, pins, and fasteners can be molded directly into plastic parts, saving time and simplifying designs. Protolabs currently doesn't supply common off-the-shelf inserts but expects to do so at some future point.
8. Liquid silicone rubber parts
Due to its "cold set" properties, extremely agreeable flow characteristics, and disregard for traditional molded part concerns like sink and knit lines, liquid silicone rubber (LSR) is breaking many of the rules of injection molding. LSR parts probably aren't going to reduce assembly part count, but they do eliminate many molding headaches and are often a great alternative to other "squishy" materials. Complex gaskets and seals can be accurately formed, and because LSR is biocompatible, heat resistant, and withstands sterilization, it is a material of choice for many medical and food applications. LSR is also forgiving of large variations in wall thickness, and undercuts are easily accommodated. For the right application, it offers big advantages.
Liquid silicone rubber (LSR) parts can eliminate molding headaches related to assemblies. Plus, because LSR is biocompatible, heat resistant, and withstands sterilization, it is a material of choice for many medical and food applications.
9. Looking at alternatives
It's a great time to be in manufacturing. Technologies and materials only dreamt of a few decades ago are now turning the design and engineering world on its head. Industrial 3D printing is one of these. Quantities permitting, parts that once required construction of an injection mold or setup and programming of a CNC machine tool can now be 3D printed in a fraction of the time and cost. What's more, the "free complexity" that comes with 3D printing often produces one-piece BOMs, thus eliminating assembly, and with part materials suitable for long-term use. Protolabs has multiple 3D-printing options available, including processes that can build plastic, metal, and elastomeric parts. Of course, some multipart assemblies are best done the old-fashioned way, by machining individual pieces and assembling them. Yet even here, the rules of designing for manufacturability and assembly apply. Keep things simple, don't make what you can buy off the shelf, explore all your manufacturing options, and understand the rules of each part of the process. Stick close to the guidelines, and you'll be designing cost-effective and efficient multipart assemblies in no time.
As always, feel free to contact one of the Protolabs applications engineers with any questions at 877-479-3680 or customerservice@protolabs.com.
Published September 2019
Rate this article
View our terms of use and privacy policy